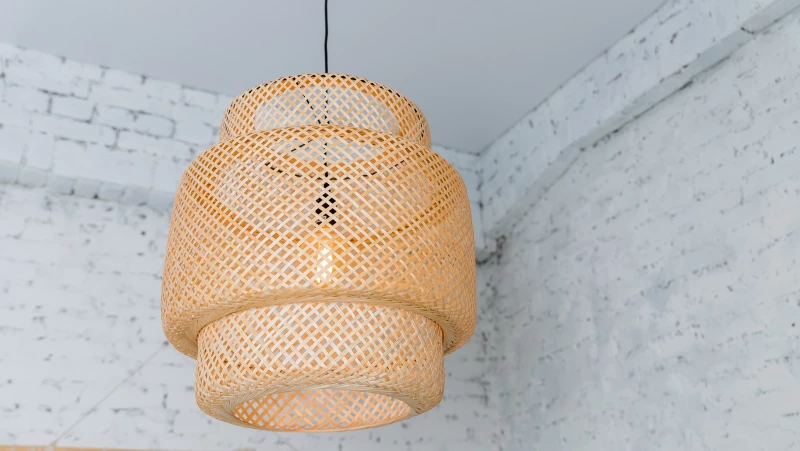
Upgrading your lighting is a fantastic way to enhance your living space. Unfortunately, if you rent your home, a chandelier installation probably isn't in your future. If your landlord doesn't allow big changes, you'll have to find another way to get that gorgeous chandelier effect. As demonstrated by TikTok user @suburbanthrills, there's a rental-friendly DIY that won't jeopardize your deposit and will give you an IKEA-style chandelier or pendant light. All you have to do is purchase a long plug-in cord with a light bulb socket on the end, feed it through a hook on the ceiling, and presto: you have a hanging light. For the sake of aesthetics, complete the project with the attractive chandelier lampshade of your choice.
Looking to add some charm to your rental without making permanent changes? @suburbanthrills has a great DIY solution for you. They recommend using the Rustic State Black Fabric Cord Set from Amazon for around $15. If you prefer a white cord, you can also check out the Wallniture Fiore 15 Feet Hanging Cord, available on Amazon for about $17. Both sets come with hooks and screws, but you can use any screw-in or adhesive hook that suits your home. To complete your chandelier, you'll need a lampshade. @suburbanthrills uses the $90 SINNERLIG lamp from IKEA, but for a more budget-friendly option, you can purchase a separate lampshade like the KAPPELAND Lampshade from IKEA, which has a similar look and costs around $50. Once you have all your materials, you can start installing your renter-friendly chandelier.
Before installing the chandelier, pick a location for your new lighting. Unlike a traditional chandelier, which is usually wired directly into the ceiling, this DIY trick relies on a wall outlet, meaning that the chandelier has to be situated near enough to a wall so that the cord can reach the outlet. Ideally, the outlet you use will also be easily accessible, so you can quickly unplug the light when it's not in use. With that in mind, dining areas, entryways, and small living rooms are all excellent spots for a chandelier in an apartment or rental house. After deciding exactly where the chandelier will go (be sure to test the cord length first) you can install the hook. The most secure way to install the hook is to screw it directly into the ceiling. However, depending on how strict your landlord is, that might not be an option. If that's the case, use a temporary hook instead, like these No Hole Adhesive Ceiling Hooks from Amazon. Just be sure to get one that's strong enough to support the combined weight of the light bulb and shade.
With the hook in place, you can feed the cord into the wire. Then, install your lampshade and light bulb. Follow any assembly instructions that come with your lampshade regarding whether the bulb or shade should be installed first. For your final step, plug your cord into the outlet and enjoy your new stylish statement lighting.