For those who enjoy tackling DIY projects, the hunt for money-saving deals on power tools is a familiar one. Particularly, the allure of battery-powered units has led many to amass a collection. Cordless power tools offer the convenience of working anywhere without the hassle of extension cords. However, the downside is the need to have multiple chargers to keep all those batteries juiced up. With chargers from different brands requiring their own specific hardware, organization becomes key.
A TikTok user known as MWA Woodworks has shared a video demonstrating how to construct a shelving unit tailored for tool storage, complete with compartments designed for battery chargers. This DIY solution not only keeps everything in its place but also promotes proper battery maintenance. By staying organized and ensuring regular charging, users can prolong the lifespan of their power tools and have fully charged batteries ready for action.
To create the charging station compartment for your power tool organizer, you will need 4x8 foot sheets of plywood cut to size. The plywood will be fastened and assembled with cabinet screws and glue. Essential tools include a power saw, a pocket hole jig, a power drill, a speed square, a level, and clamps. For precision matching the TikTok video, additional specialized tools like a shelf pin jig and a hand pull saw are required.
How to create the charging station compartment for your power tool organizer
As seen in the full build on YouTube, the MWA Woodworks power tool charging and storage station uses plywood to create an open compartment for the battery chargers. Chargers can have different sizes, so measure the units you use to create the proper height and depth in the compartment. Be sure to include the height of a plugged-in battery when measuring the space you'll need, as the compartment should allow you to charge the batteries in place.
When designing the power tool shelf organizer, start by assembling the compartment and then drill a hole in the bottom piece of plywood to allow the power cord for the power outlet strip to pass through and reach the wall outlet. Ensure that the power strip's electrical cord is long enough to reach the outlet, depending on where you plan to hang the organizer on the wall. To create a clean look for the final layout, consider adding a strip of plywood as a false wall in the compartment to hide the cords from the chargers and the power strip. This will also make it easier to insert and remove batteries when the multiple cords are corralled.
It's important to place the chargers in a cabinet like this to protect them from environmental conditions such as direct sunlight, which can cause a heat buildup. The compartment should be spacious enough to allow for proper ventilation that dissipates heat effectively, thus extending the lifespan of the battery and charger.
Designing the power tool shelf organizer

In the MWA Woodworks TikTok video, the cabinet offers storage space for nearly 20 power tools, about half a dozen chargers, several batteries, and various boxes of screws, fasteners, and nails. However, you can adjust the design to make it smaller if you don't require as much storage space for your cordless power tools.
As part of the project, create compartments to hold the power tools. Design larger compartments for items like saws or sanders by constructing a big box out of plywood and adding dividers to accommodate the size of your specific power tools. Use a pocket hole jig to attach the pieces neatly, consider adding glue and using clamps to secure everything in place until it dries, and use a level to ensure the structure is square.
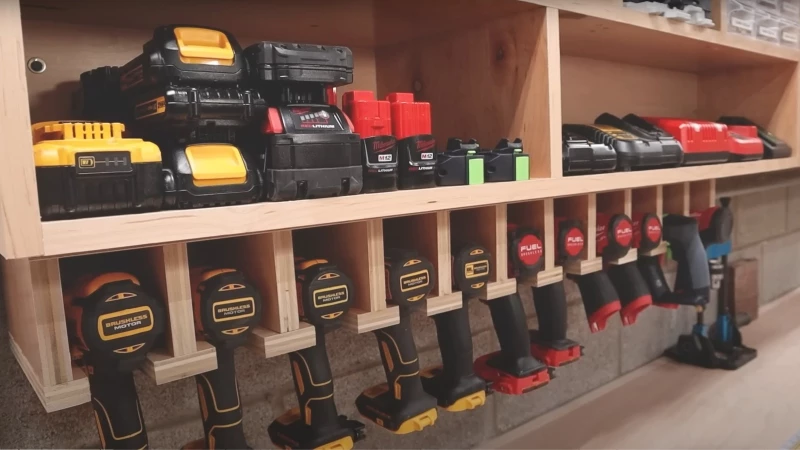
Organize Your Power Drills with Hanging Storage Compartments
Looking for a way to tidy up your workspace and keep your power drills easily accessible? Try creating hanging storage compartments for them. Here's how:
- Start by attaching small vertical sections of plywood to a larger horizontal piece. These vertical sections should be spaced to accommodate the width of the main body of the power drill.
- Next, add small horizontal segments of plywood underneath the vertical pieces. Leave a gap between the vertical and horizontal sections to allow the drill handle to pass through while supporting the weight of the top part of the drill.
- Hang the plywood structure on your wall, ensuring that the handle of the drill hangs down while the main body rests securely in the compartment.